1 Comment

WHY DID THE TOMATO BLUSH?

Because he saw the salad dressing!

Terrible jokes aside, it’s time for us to share another one of our much-loved recipes. Whilst many people are familiar with the more well-known Apple Tarte Tatin, I wanted to share the version I first came across in a cookbook I purchased as a teen when first starting to explore what could be created in the family kitchen. A version created with not apples, but a savoury version with tomatoes (what a revelation!). Being one who can tend to favour savoury over sweet, I completely fell in love with just how delicious this version is (it's always a savoury, not sweet French toast cooked up at our place, but that's another blog post).

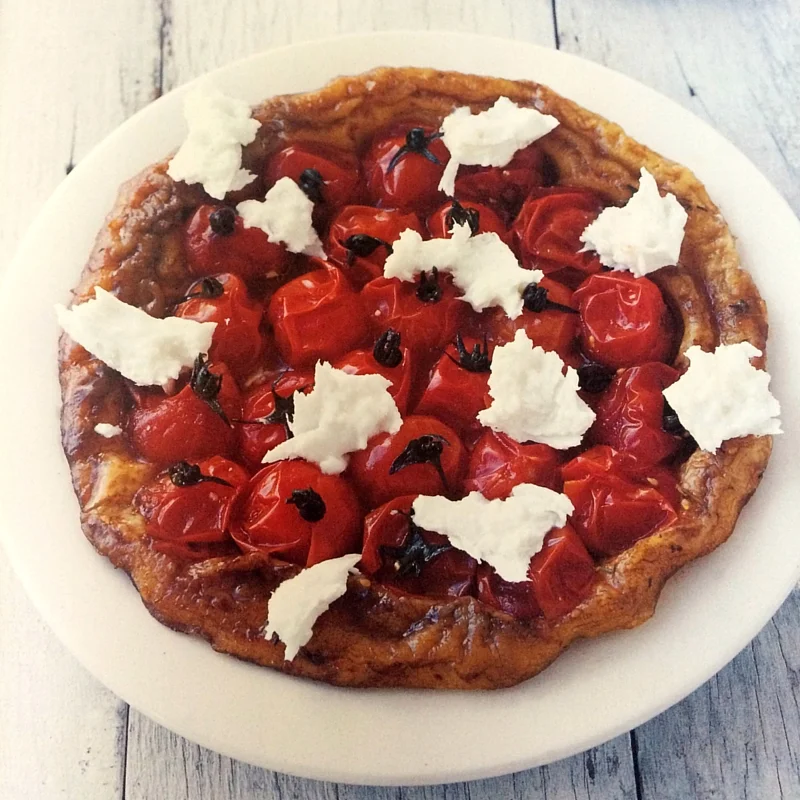
This dish is excellent for a lazy weeknight dinner, or even better as part of a Sunday brunch. The tomatoes are complimented with mozzarella, balsamic vinegar, and thyme, a combination that’s completely addictive.

tomato-tarte-tatin-catering-brisbane

Tomato Tarte Tatin

(6 servings)

Ingredients

  • 1 tablespoon balsamic vinegar
  • 1 tablespoon sugar
  • ½ teaspoon thyme leaves
  • 20-24 small truss tomatoes or cherry tomatoes
  • 1 sheet frozen butter puff pastry (trimmed)
  • 100gm buffalo mozzarella cheese
  • 2 tablespoon extra virgin olive oil

Method

Preheat the oven to 200°C. Put the vinegar, sugar and thyme in a non-stick frying pan and place over medium heat.  Allow to simmer for a few minutes, stirring until the sugar dissolves, then add the whole tomatoes.  Toss the tomatoes in the sweet syrup for a few minutes to ensure they are well coated, then removed from the heat and allow to cool completely in the pan.

Lightly grease the inside edge of a 20cm (8 inch) pie dish, then arrange the tomatoes over the base and drizzle with the cooking liquid.

Place the sheet of puff pastry over the tomatoes and tuck the edges of the pastry in a little around the tomatoes.  Place the pie dish into the preheated oven and bake for 20-25 minutes, or until the pastry is puffed up and golden brown.  Place a large serving plate over the top of the pie dish and flip the tart and pan upside down.  The tart should now be sitting on the plate with the tomatoes facing up.  Tear the buffalo mozzarella into several pieces and scatter over the tart.  Drizzle with a little extra virgin olive oil

(recipe is taken from Marie Claire – Comfort)

1 Comment

1 Comment

JUST A LIL' BIT OF PUMPKIN

I’m sitting here sipping on my matcha green tea coconut milk (it tastes better than it sounds) writing this post and thinking about pumpkin, and weirdly pumpkin pie is the first thing that comes to mind, followed closely by the thought of pumpkin soup. It’s weird that pumpkin pie is the first thing I think of because I’ve had it only once in my life, and I’ve never even cooked it – I blame the Internet, Starbucks, and all the “pumpkin pie spice is life” memes. Pumpkin soup on the other hand when I was growing up was a family staple in the cooler months, partly because it was cheap to make bulk, but mostly because my mother looooves pumpkin soup – but only if it’s made with butternut pumpkin and served with fresh bread slathered in real butter.

Pumpkins are a pretty awesome vegetable (though apparently it’s technically a fruit) when you think about it. They come in so many shapes and sizes, and you can do so much with them – savoury and sweet – dips, pies, roast, salad, scones, muffins, … I could go on. There are so many strange looking pumpkins – the heirloom ones are the strangest!

My favourite type of pumpkin to cook is the butternut pumpkin (blame my mother for this bias) because it’s one of the sweeter ones. Don’t get me wrong, if you roast any kind of pumpkin I’m totally going to eat it and enjoy it, skin and all because roast pumpkin is all sorts of delicious! The little bit of caramelisation around the edges that happens when you roast pumpkin are the best. Although put it beside a well roasted potato (with a few mixed herbs) and it’s a difficult decision which to eat first. Have I mentioned roast dinners are fabulous?! Anyway, I’m getting distracted now thinking of a roast dinner.

Pumpkin soup is something that I’ve never enjoyed unless it was homemade. I tried a pre-made soup out of a tin packet…it just wasn’t the same. I think because of the good memories I have of sharing pumpkin soup around a big table with my whole family (my parents, two older sisters and my little brother) that I can’t ever really enjoy pumpkin soup unless it’s made by myself or someone I care about. If I take a moment a just sit and think back to the times I’ve had pumpkin soup, it brings a smile to my face and warms me from the inside out because it brings to mind the love of my mother, the joy of sharing a meal with my friends on a cool night, and the contentment I always feel after spending time with people I love and who love me.

I don’t know about you, but I love to find new ways to enjoy some of my favourite meals. I’m always on the hunt for a slight variation in one of my favourite meals that allows me to appreciate my favourite just that little bit more. I especially love seeing other people enjoying their favourite meal all the more because they’ve added a new ingredient or two that adds another dimension to it. It just lights up their face and that in turn makes me happy, because I love to cook and to I see someone else enjoying cooking and what they’ve created is a fabulous thing.

I think it was a couple of winters ago now, my mum and older sister fell back in love with pumpkin soup (it stopped being a favourite for a while because it was made just one to many times) – this time with a bit of a Thai style twist to it thanks to a friend of the family. I’ve got for you here a basic pumpkin soup recipe (the one my family uses) and then some changes you can make to add a bit a twist to it if you’re looking for something a little different.

Pumpkin Soup

(Serves approx. 6)

Ingredients

  • 1 kg butternut pumpkin (or more), skin off and diced
  • 2-3 medium onions, skin off and roughly chopped
  • 2 cloves garlic, peeled and roughly chopped
  • 1 tablespoon butter
  • 1.5L – 2L liquid stock (chicken is great)
  • Sea salt
  • Freshly ground black pepper
  • Nutmeg (ground)

Method

  1. Sauté the onion and garlic in the butter in a large saucepan over a medium to high heat, until the onion has become opaque (clear-ish).
  2. Add the diced pumpkin and cook for about 8 minutes.
  3. Pour in the stock, a pinch of salt and pepper and nutmeg. Bring to the boil, reduce heat and simmer covered until the pumpkin is tender.
  4. Remove from the heat, and (carefully) using a stick mixer (or in a blender) blend the mixture until smooth.
  5. Serve with fresh bread and butter.

Note: Depending on how thick you like your soup, adjust the amount of stock used. If you like, you can add a dollop of cream to the soup to serve and extra pepper to taste

Want to make it with a Thai-style twist?

  • You'll need - in addition to the above ingredients:
    • 1 medium sweet potato (peeled and diced)
    • 2 medium carrots (peeled and diced)
    • 1 table spoon of red curry paste (Thai style)
    • Juice of 1/2 lime (or more, to taste)
    • 2 x 270mL cans of coconut milk (full cream or light)
    • Fresh coriander, rinsed and roughly chopped
  • Optional: Use less pumpkin (1/2 butternut pumpkin) and instead use the sweet potato and carrots. Or you could just add the extra ingredients to make more soup. It's up to you.
  • At Step 2 - add the red curry paste
  • At Step 4 - add in the coconut milk and blend together. Then stir through the lime juice and coriander

1 Comment

1 Comment

WHEN LIFE GIVES YOU LIMES...

As a kid growing up I never liked limes, not even lime cordial or lollies (though pine-lime Splices were delish!), which is about as far as you can from actual limes! But now?? I’ll make a lime and coconut stir-fry or add kaffir lime leaves and lemongrass to my rice and quinoa as I cook it, when I’m looking for something a little different to go with my meal. I’ve definitely come to appreciate the zesty appeal of fresh lime in cooking or in drinks.

Did you know that there are more varieties than the smooth skinned limes that we see everywhere in the shops? I didn’t, well not until I actually started exploring more in my cooking. The Tahitian (or Key) lime (the one we know best) is seedless and very juicy – so great for drinks like a margarita ;), where as the Kaffir lime is lumpy, seeded and has very little juice – the leaves are most commonly used in cooking, particularly Thai recipes.

Oh but the humble lime is not just confined to Thai cooking, there are (so I discovered recently) some very delightful ways to enjoy lime. On a recent holiday in New Zealand with my family I was on the hunt for an easily transportable snack (we were driving around the North Island) and because I have a couple of food intolerances it’s a bit more challenging if I want something more exciting than plain rice crackers, anyway I stumbled across an organic store that stocked some ‘me friendly’ snacks. Now I’m generally pretty open to trying new flavour combinations because when your diet is limited like mine, to come across something new and actually find it’s not horrible (much less delicious) is much more exciting than I like to admit. Well, I thought I’d try out some cookies that looked interesting. Pistachio and lime flavoured cookies. At first I was a little sceptical, not that I don’t think lime goes well with nuts or nutty flavours (I love me a lime and macadamia raw cheesecake or crunchy baked lime and coconut chicken), pistachios and I have had a rough history – I always seemed to get the dodgy ones in the packet. Oh man, when I took my first bite I was prepared to be disappointed, but instead I found myself having to hold back and not shove a few more cookies in my mouth. I immediately rushed off to force my family to try one too, but then hoard the rest of packet because I wanted them all for myself. Hahaha!

Why did I just spend all that time telling you about a bunch of cookies? Well, mostly to get you to consider trying limes with other flavours you might not expect to be any good… or try something new that has limes in it. If you’re making a guacamole, add lime juice rather than lemon… or use lime juice as the star of your own homemade salad dressing rather than a store bought jar (then test it out on some unwitting friends and family). One of my favourite things to do is test out new recipes on my friends or family and talk to them about how my latest dish came about. Usually in a rambling story like the one I just shared with you! But I must say that my adventures in the kitchen are made so much better in the sharing of a meal and story.

Have you ever discovered something new, and then you see it everywhere? Well this has happened to me very recently... interestingly enough I've come across an Australian native I didn't know about. My little nerd heart loves to learn new things so I just had to share this with you too. :) 

Native Limes in the Limelight …

Ever heard of a Finger Lime? I sure hadn’t until I stumbled across a recipe on Pinterest for an ‘avocado dip’ (which I assume is just another way of saying guacamole) that used citrus caviar from Finger Limes to make it look a little fancy and add something a little different. 

After doing a little digging around with the help of my old friend Google, I discovered that Finger Limes (aka ‘Rainforest Pearl’) are in fact one of Australia’s six species of native citrus. The Australian Finger Lime is native to the rainforests on the boarder ranges of South East Queensland and Northern NSW. 

The trees are thorny and produce distinctive finger shaped fruit that can be up to 12cm long. Typically both the skin and pulp are green-yellow in colour, though over the years different variations have been cultivated with different skin and pulp colours. The intensity of the skin and pulp colour can be affected by flowering times and climactic conditions.

Source: Pryor (2011). Photo by Janet Durham

Source: Pryor (2011). Photo by Janet Durham

While the flavour is similar to that of the limes we all know, the pulp is caviar like in appearance hence the nickname of ‘citrus caviar’. The tiny capsules of lime juice that ‘pop’ add a burst flavour and texture to a dish. Pemberton Finger Limes, a Western Australian grower and suppler, say that Finger Limes should always be cut open crossways, not lengthways and then slowly squeeze out the ‘citrus caviar’ – like squeezing toothpaste from a tube.

Pemberton Finger Limes has provided some tips for storing Finger Limes…

  • Store in dry and cool conditions – between 10-20°C, no cooler than 5°C
  • They’re best kept in an open paper bag or cardboard box
  • You can keep them in your fruit bowl, but make sure they’re not under other fruit
  • The shelf life of a Finger Lime is between 3-4weeks.

The Australian Superfood Company sells Freeze Dried Finger Lime (powder) that they say is an interesting addition to dukkah. You could also use the powder in a green smoothie to add a zesty twist.

Are you all limed out? I’m certainly not! I think I might go make some pistachio and lime balls for snacks this week. How will you be using lime next time?


Sources:

  1. Hardy, S., Wilk, P., Viola, J., Rennie, S. (2010, January). “Growing Australian Native Finger Limes” Prime Fact 979. Retrieved from http://www.dpi.nsw.gov.au/__data/assets/pdf_file/0016/320272/growing-australian-native-finger-limes.pdf.
  2. Pryor, C. (2011, 17 June). Food on Friday – Finger Limes. ABC Rural – Bush Telegraph. Retrieved from http://www.abc.net.au/site-archive/rural/telegraph/content/2011/s3246629.htm.
  3. Pemberton Finger Limes. (2014). Pemberton Finger Limes. Retrieved from http://www.pembertonfingerlimes.com.au/.

1 Comment

1 Comment

WINNER WINNER CHICKEN DINNER

One of my family’s favourite meals is a roast dinner, the only person who doesn’t enjoy it quite as much is one of my older sister’s, but that’s only because she’s vegetarian so she doesn’t count. ;) A roast chicken is something that gets cooked when everyone in the family is all together – me, my 3 siblings (2 sisters and a brother), and my parents. My dad especially loves it when I cook a roast dinner, his favourite is definitely the whole roast chicken with garlic, lemon and thyme (I think I used a Jamie Oliver recipe).

Chicken is by far one of my favourite meats to cook, for so many reasons! I think my favourite thing is that there are so many different cuts of chicken…breast fillets, wings (wingettes), thigh fillets, drumsticks, Maryland (thigh with drumstick attached). Thigh fillets and breast fillets are good for stir frys, drumsticks are great for easy portioning of meals, Maryland’s look great as roasted and are good for when you’re feeding someone who needs to eat larger portion sizes. If you’re interested in learning how to dismantle a whole chicken Stockman’s Daughter has great ‘how to’ instructions (including a video) for dismantling a chicken. Another reason is that because of the different cuts there are so many different ways to cook it and so many different flavours to work with. I love a good Thai-style chicken stir fry with a tonne of crispy veggies served with coconut rice, or baked marinated chicken wings or drumsticks with salad and chips; barbequed chicken kebabs are a favourite of my young nieces and nephew. It’s definitely a versatile meat and it’s generally pretty cheap too, which when you’re on a budget is fantastic. It was my default source of protein (other than mince, or brown lentils) as a uni student because a bulk buy of chicken (any cut really) would get me through quite a few meals. More recently I’ve been trying to be more sustainable in my cooking and I’ve been looking into how to use a whole chicken. In my search I’ve found recipes for using the carcass or bones to make my own chicken stock, or even bone broth. I’m yet to have a crack at my own bone broth, though I’ve read it’s quite good for your health. If you’ve got a whole chicken and you’re flat roasting it (aka spatchcocked), the backbone you cut out can be used to make a stock or soup, so there’s less waste.

 
WEB BLOG QUOTE.jpg
 

I think it was in November last year (I can’t believe it’s 2016 already!) a friend of mine invited a few people over for dinner and cooked us an amazing roast meal…and you guessed it, it was roast chicken! But it wasn’t any old roast chicken with the usual flavours, it was lemon and macadamia! I’d never had macadamia with chicken before, in fact the combination had never occurred to me so I watched closely as she prepared the chicken – she’d decided on using Maryland’s because there weren’t enough of us to justify roasting a whole chicken and we were a little short on time. As she prepared the meal we spoke about a lot about our favourite meals and shared stories of meals we’d cooked for our friends and family in the past and the meals we were looking forward to cooking them in the future. We both love to cook for the important people in our lives, though I tend to prefer baking desserts and sweet treats. We both felt that the cooking of the meal was a way to show our friends and family that we cared and the opportunities the shared meals gave us to spend some quality time with them. The chicken turned out fabulous and the conversation and time spent with my friends was so refreshing and rewarding, particularly because it was towards the end of the year when things tend to get a bit hectic. I’ve decided to share with you the recipe for the lemon and macadamia chicken. While my friend used Maryland’s it’s fabulous as a flat roasted (Spatchcocked) chicken. I like to serve this with roast sweet potato, carrot, potato, and pumpkin that have been lightly coated in olive oil and tossed in dried or fresh rosemary, and with some blanched (so they’re still crispy) broccoli, beans, and peas.

Flat Roast Lemon & Macadamia Chicken (Serves 6)

Ingredients:

  • 1 whole chicken (approx. 1.2kg)*
  • 1 ½ cups raw whole macadamia nuts, raw roughly chopped**
  • Zest of 1 whole large lemon**
  • ½ large lemon, finely sliced into discs (slice up the zested lemon)**
  • Salt & Pepper
  • Olive Oil

Method:

  1. Preheat the oven to 220°C.
  2. To prepare the chicken - cut along both sides of the backbone of the chicken with a sharp knife or kitchen scissors, remove the backbone (keep it for stock or soup), turn the chicken over then press firmly on the breastbone with the heel of your hand to flatten it out (or you can ask your friendly butcher to do it for you). Place on a baking tray lined with baking paper.
  3. Mix together the roughly chopped macadamias and lemon zest.
  4. Using a sharp knife lightly slice along the bottom edge of the chicken and separate the skin from the meat using clean hands (separating the skin from the meat is a little bit gross but the texture and flavour at the end is worth it!). Between the skin and the meat of the chicken stuff the macadamia and lemon zest mixture. Push the macadamia and zest mixture as far as it will go without tearing the skin, trying to get the mixture over as much of the chicken as possible. The result is a very bumpy looking chicken, it might look a bit strange but it’ll taste fantastic!
  5. Rub the skin of the chicken with a little olive oil and season with salt and pepper. Cover the meatiest parts of the chicken with lemon slices or however you like. Covering the chicken with lemon slices is optional, but it does look good.
  6. Roast in the preheated oven for 30 – 45 minutes, or until cooked through (juices run clear).
  7. Serve on a platter with roast vegetables and steamed greens.
roast-chicken-catering-brisbane


NOTES:

* If you want to make this for 2 people, instead of a whole chicken you can use 2 Marylands with skin on, ½ cup of macadamia nuts, and the zest of a small lemon (or ½ a medium sized lemon) instead. Roast them at 220°C for 45 minutes.

** If you’re not a big fan of nuts or allergic to them there are plenty of other flavour combinations you could try. Here’s a list of different spices, herbs, and other flavours that work well with chicken…just take the above recipe and swap out the nuts and lemon with the flavours you like best.

  • Herbs: fresh or dried thyme, fresh or dried rosemary, fresh or fried coriander, fresh or dried marjoram, sage, fresh parsley, fresh tarragon
  • Spices & Spice Blends: garam masala, jerk seasoning, dukkah, harissa, chilli powder, herbes de provence, cayenne pepper, smoked paprika
  • Other: lemon, orange, garlic, soy sauce, white wine, honey, ginger, pesto, miso paste, lime, Dijon mustard, brown sugar, pineapple, coconut, nuts – almonds, macadamia, pistachio, cashew

If you’ve never spatchcocked a chicken before here’s a handy instructional video from BBC Good Food - How to flatten (spatchcock) chicken (BBC Good Food)

Hopefully you’re now off to plan your own roast chicken to share with friends and/or family! We’d love to hear what you think of the recipe and any other flavour combinations you love to use on a roast chicken.

1 Comment

1 Comment

WHERE THE MAGIC IS ….

A few nights ago a friend of mine dropped in after dinner for a glass of wine and a chat.  Usually when guests arrive at my house they fill their wine glasses or their teacups and head to the table on my verandah which is commonly known as the ‘the spot’.  However, now that the weather has turned a little chilly the lounge has become the current entertaining space.

As my friend and I sat chatting he reached over to put his drink on the coffee table and noticed a box of coasters.  The coasters were a Christmas gift, they’re the ones that look like little vinyl records, in ode to my love of music.  He asked why the coasters were still in a box and suggested it might be more ‘user friendly’ to take them out. - don’t you just love a helpful friend!  I hadn’t really thought about it before, but he was right.  I had been keeping them in the box so they wouldn't  look messy but  as a result I’d never actually used them.

This lead to a conversation about keeping things for special occasions and I was reminded of the dinner parties my parent’s had when I was a child. 

My brother and I always picked up on the ‘someone’s coming to dinner vibe’ as the special occasion things made an appearance. A great deal of effort was put into these evenings. The ‘good’ china came out of the cupboard, the silver cutlery got a polish and the timber furniture glistened.

Mum always cooked a chicken and slivered almond dish when people were coming over, which was followed by a sour cream cheesecake.  Tantalizing cooking smells would fill the house (combined with the subtle odor of Mr Sheen).  Specially selected vinyl records were taken from the old fashioned stereo cabinet, and dust was blown from their covers to get them ready for people’s easy listening pleasure.  To this day a Carpenters song or something by Simon and Garfunkel can also take me back to those moments.

I would try not to get in the way while preparations were happening.  Which means of course that I didn’t want to polish the silver or the the furniture.  Instead I would head to the large cane swing chair on the verandah and read a book while waiting in anticipation for the evening ahead.  This was a time when people wore their 'Sunday best' when going to go someone's house for dinner, and they always brought a gift for the host (and sometimes the host's children).

As a child my parent's dinner parties always seemed so exciting and mysterious.  It felt like something magical was happening in those moments.  And perhaps it was.

Now that I'm of an age where I sometimes have dinner parties of my own, I realise that as adults we can get so caught up in the hustle and bustle of life that we forget to notice the magic.  We can easily forget that having an opportunity to share food and conversation with the people in our lives truly is a special occasion and should be treated that way.  The good china and the polished silver aren’t really necessary ingredients but the connection shared, the atmosphere, the conversation and the food – now that’s where the magic is.

My little vinyl record coasters are now out of their box and proudly scattered across the coffee table just waiting for people to pop in.


Magic Sour Cream Cheesecake:

250g packet plain sweet biscuits

150g butter, melted

250g packet cream cheese, softened

250g cottage cheese

3 eggs

1 cup (220g) caster sugar

2 tablespoons cornflour

½ cup(125ml) milk

1 cup sour cream

1 tablespoon finely grated lemon rind

1 teaspoon lemon juice


Preheat your oven to 170 (150 fan forced).  Blend or process bikkies until they are the consistency of fine bread crumbs.  Add the melted butter and processes until combined.  Press the mixture evenly over the base and side of a 20cm springform tin.  Place on an oven tray and pop in the fridge for about half an hour or until firm.  While the base is cooling, beat the cheeses together until smooth and then beat in the eggs one at a time.  Stir in the sugar and cornflour followed by the milk , cream, rind and juice.  Pour the mixture into the crumb crust.  Bake in the oven for about 50 minutes.  Let it cool in the oven with the door ajar and refrigerate overnight.  Add a few raspberries on top before serving.

MAGIC SOUR CREAM CHEESCAKE

MAGIC SOUR CREAM CHEESCAKE

1 Comment